
SKILLS UPRISE · CYBER LAB SERIES · LAB 01A
Build the Kali VM in VirtualBox
Before Kali can be installed, the machine has to exist. This lab builds the empty VM — disk, memory, processors, display, boot order — and attaches the ISO, following the same procedure OffSec uses to produce the official Kali VirtualBox images. Sixteen steps. Every screen has the official screenshot next to it.
Beginner · 20–30 minutes · Host: Windows, Linux or Intel Mac · VirtualBox 7.2.14 · Updated July 2026
BUILD SHEET
Two columns because the official numbers are a floor, not a target. Either set works.
This lab stops the moment the installer appears. Lab 01B picks it up from there and walks every installer screen.
BEFORE YOU START
Four things, then twenty minutes of clicking
This is the least glamorous lab in the series and the one that causes the most reinstalls. Get the disk size and the boot order right now and you will not touch these panels again all semester.
Virtualisation enabled
Intel VT-x or AMD-V switched on in BIOS/UEFI. The official guide flags this as the one prerequisite.
80 GB free, on an SSD
The guide uses an 80 GB dynamic disk. It only consumes what Kali actually writes, but leave the room.
The Kali installer ISO
Downloaded and checksum-verified. You will attach it at step 12, so have the path ready.
VirtualBox already installed
This is Kali as a guest. Installing VirtualBox on top of Kali is a different guide entirely.
Your wizard will have fewer screens than these screenshots
The official screenshots show VirtualBox's older step-by-step wizard, where memory, disk type, allocation and size each got their own page. VirtualBox 7 folded those into one dialog. Nothing was removed — the same options moved:
One extra thing to do that the old wizard did not have: on the Name and Operating System page, tick Skip Unattended Installation. Left unticked, VirtualBox 7 tries to script the install for you, which does not fit the Kali installer.
PART 1 OF 4
The New Machine wizard
Seven screens in the original wizard, three or four in VirtualBox 7. Same answers either way.
01
NEW
Machine → New
Open VirtualBox and choose New from the toolbar, or Machine → New from the menu. If this is a fresh install your machine list is empty and the button is hard to miss.
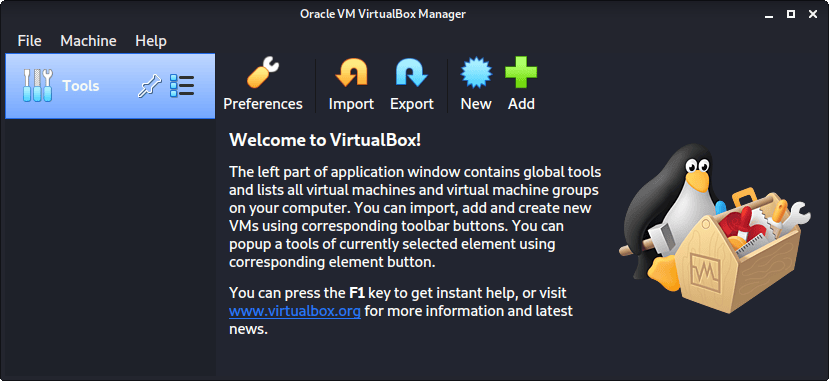
The VirtualBox Manager with New in the toolbar.
Kali Linux Documentation · GPL-3.0
02
NAME + OS
Name it, and set Type Linux / Version Debian (64-bit)
The name becomes the folder name and the prefix on every file this VM owns — configuration, virtual disk, snapshots. Renaming later does not rename those files, so pick something you can live with. OffSec names its public images with the release number, kali-linux-2026.2-vbox-amd64, because a published image is a fixed snapshot. For your own machine the guide deliberately keeps the name generic, since Kali is a rolling release and the version in the name goes stale within weeks. We use kali-lab01. Type is Linux. Version is Debian (64-bit) — Kali is built on Debian, and there is no Kali entry in that list. Picking a 32-bit version here is the classic mistake; if 64-bit options are missing entirely, virtualisation is switched off in your firmware.
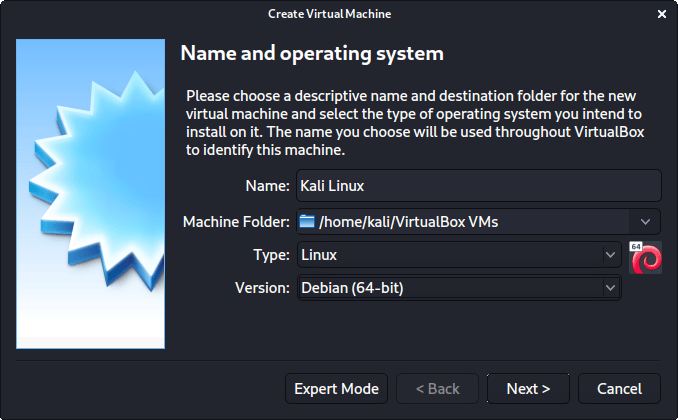
Name and operating system, with Type Linux and Version Debian (64-bit).
Kali Linux Documentation · GPL-3.0
03
MEMORY
Base memory: 2048 MB officially, 4096 MB in our lab
The official guide uses 2048 MB for the general-purpose images, and says outright that they raise it on their own machines where there is spare RAM. Several Kali tools are genuinely memory-hungry. Our rule: 2048 MB if your host has 8 GB total, 4096 MB if it has 16 GB. Stay inside the green portion of the slider — the red end starves the host, and a swapping Windows makes the VM feel broken when it is only starved.
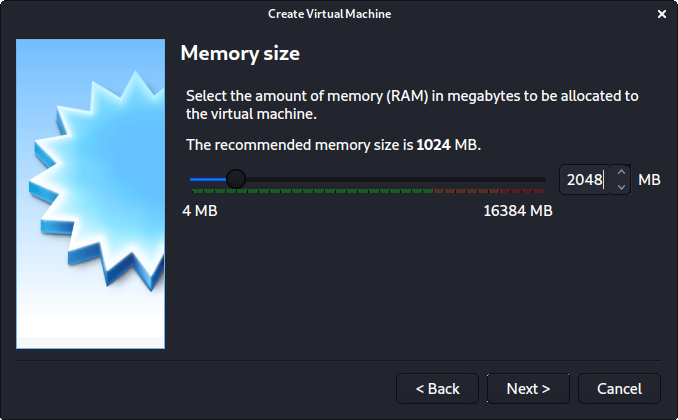
Memory size — the guide's 2048 MB baseline.
Kali Linux Documentation · GPL-3.0
04
DISK
An 80 GB VDI, dynamically allocated
Four screens in the old wizard, one in VirtualBox 7. The answers: Create a new virtual hard disk now — you have nothing to reuse. VDI (VirtualBox Disk Image) — the native format and the default. VHD and VMDK exist for moving disks to Hyper-V or VMware; you do not need that today. Dynamically allocated — the file starts near 2 GB and grows only as Kali writes. Pre-allocating reserves the full 80 GB immediately for a marginal speed gain. 80.00 GB — the size OffSec uses for the official images. Eighty gigabytes sounds enormous next to a 4 GB ISO, and it is the number people cut first. Don't. Because the disk is dynamic it costs you nothing up front, and growing it later means the Virtual Media Manager plus a gparted session inside Kali — the last section of this lab, and an afternoon you did not plan for.
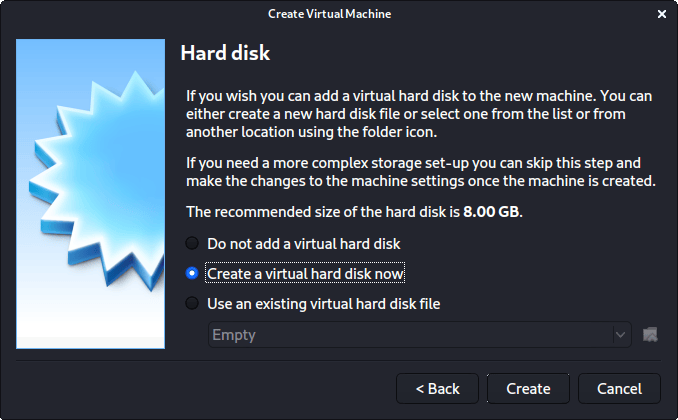
Hard disk — create a new virtual disk now.
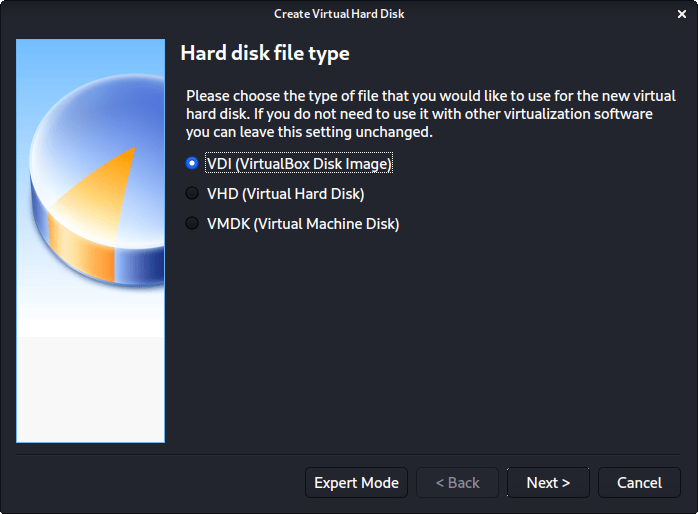
Hard disk file type — VDI, the default.
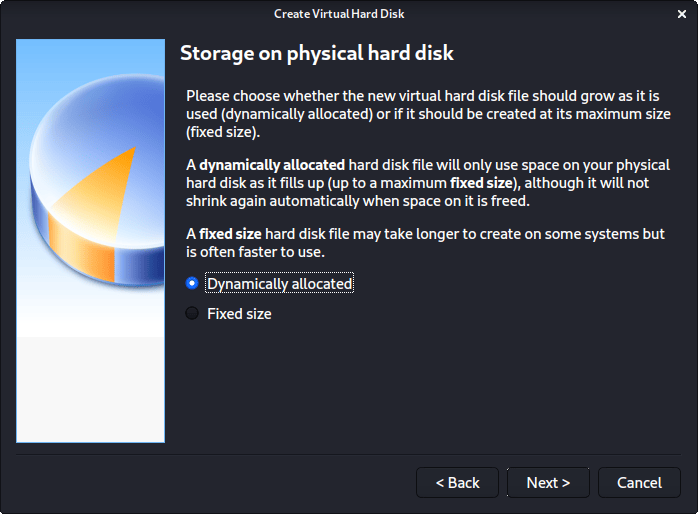
Storage on physical hard disk — dynamically allocated.
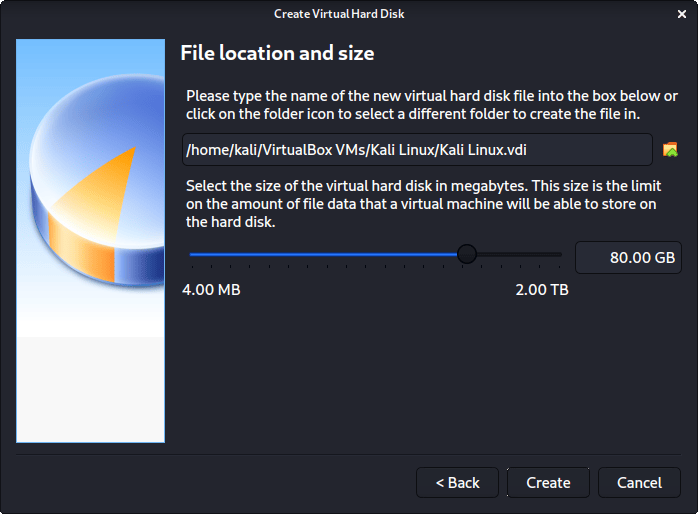
File location and size — 80.00 GB.
Kali Linux Documentation · GPL-3.0
PART 2 OF 4
The settings pass
The wizard creates a generic machine. These five panels turn it into a usable Kali box.
05
SETTINGS
Select the VM, then click Settings
The wizard is done and the machine exists, powered off, with default hardware. Everything from here is in Settings, and all of it can be changed later — except while the VM is running.
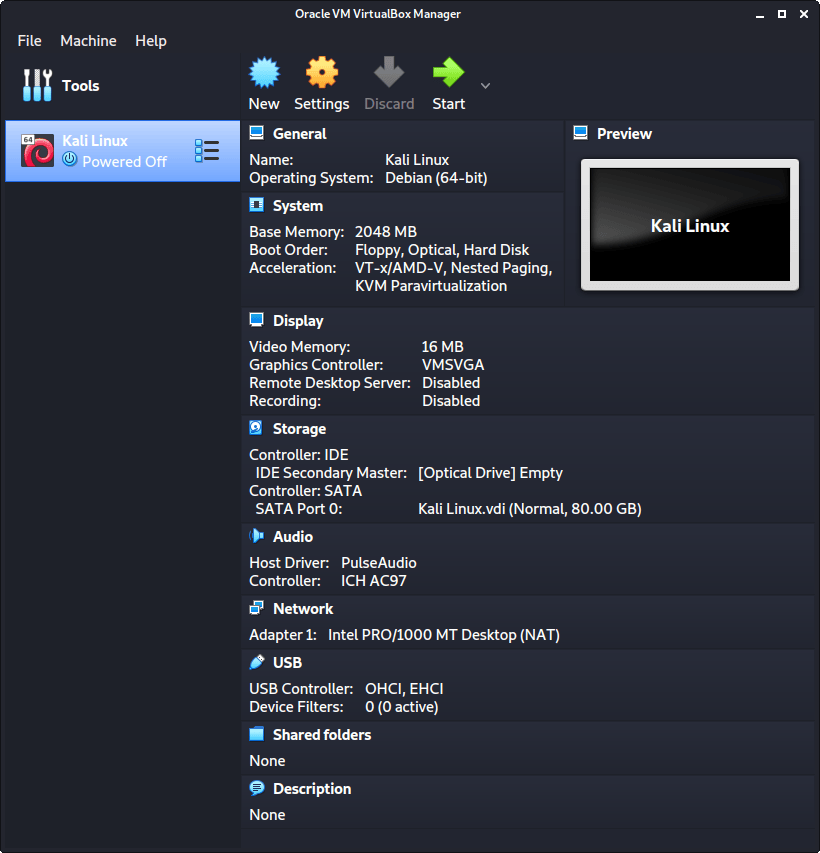
The new VM selected in the Manager, with Settings in the toolbar.
Kali Linux Documentation · GPL-3.0
06
CLIPBOARD
General → Advanced: both dropdowns to Bidirectional
Shared Clipboard and Drag'n'Drop both default to Disabled. Set both to Bidirectional and you can copy a command from this page straight into the Kali terminal instead of retyping it and misreading a hyphen. Worth knowing for later: a shared clipboard is a channel between host and guest. On a lab VM that is convenience. On a VM analysing something genuinely hostile, that channel is exactly what you turn off.
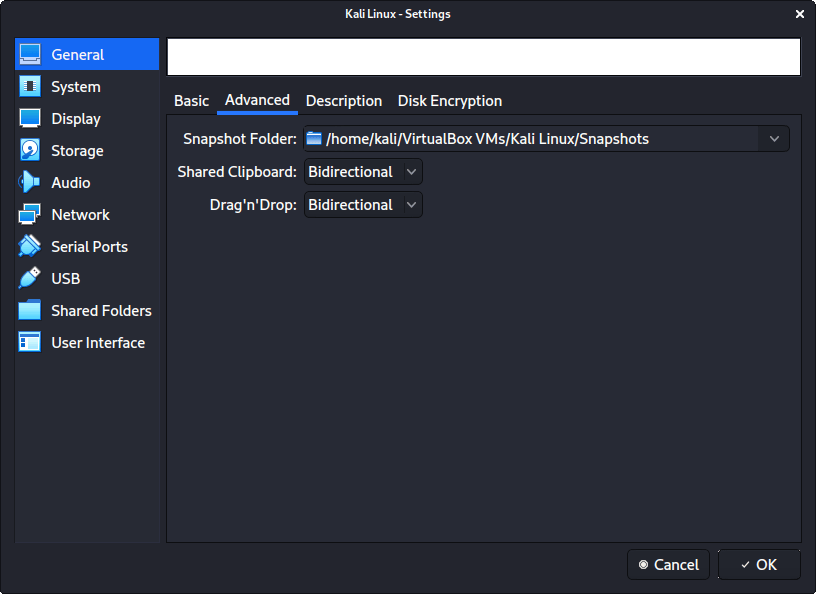
General → Advanced with both dropdowns set to Bidirectional.
Kali Linux Documentation · GPL-3.0
07
BOOT ORDER
System → Motherboard: Hard Disk first, Optical second
The official order looks backwards — surely the ISO needs to boot first? It works because a brand-new virtual disk has no bootloader on it, so the firmware falls through to the optical drive and boots the installer anyway. The payoff comes after installation: with Hard Disk first, the VM boots straight into Kali even if you forget to eject the ISO. Set Optical first instead and every reboot lands you back in the installer, which is how students end up installing Kali three times in one evening. Untick Floppy and Network while you are here. The guide disables everything else.
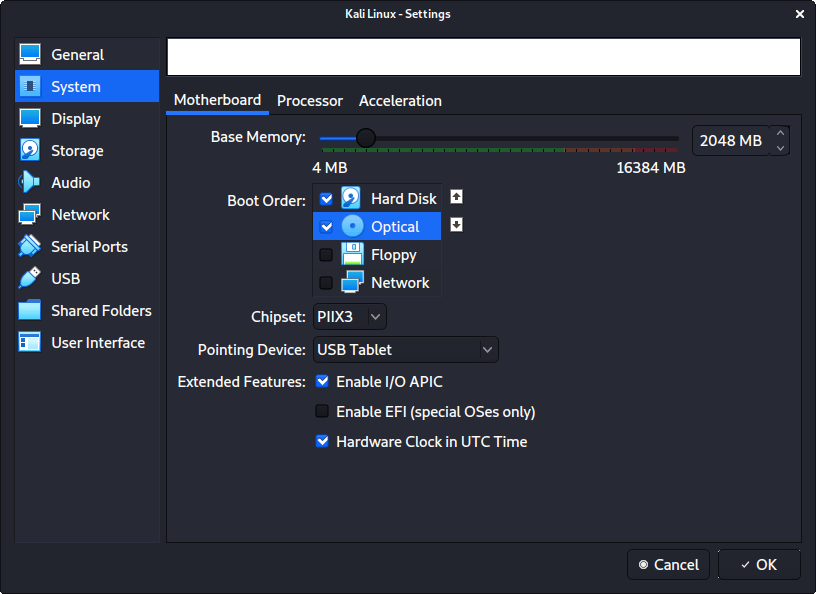
System → Motherboard with Hard Disk at the top of the boot order.
Kali Linux Documentation · GPL-3.0
08
PROCESSOR
System → Processor: 2 CPUs, and enable PAE/NX
Two processors, which the guide specifies and which is enough for coursework. Do not hand over every core you have — the host still needs to schedule itself, and an over-provisioned VM is slower, not faster. Two is right on a 4-core laptop; four is reasonable on 8 cores. Tick Enable PAE/NX under Extended Features. NX is the no-execute bit — the CPU flag that marks memory pages non-executable, which the kernel relies on for exploit mitigation. Leaving it off is an odd way to configure a machine you are about to study exploitation on.
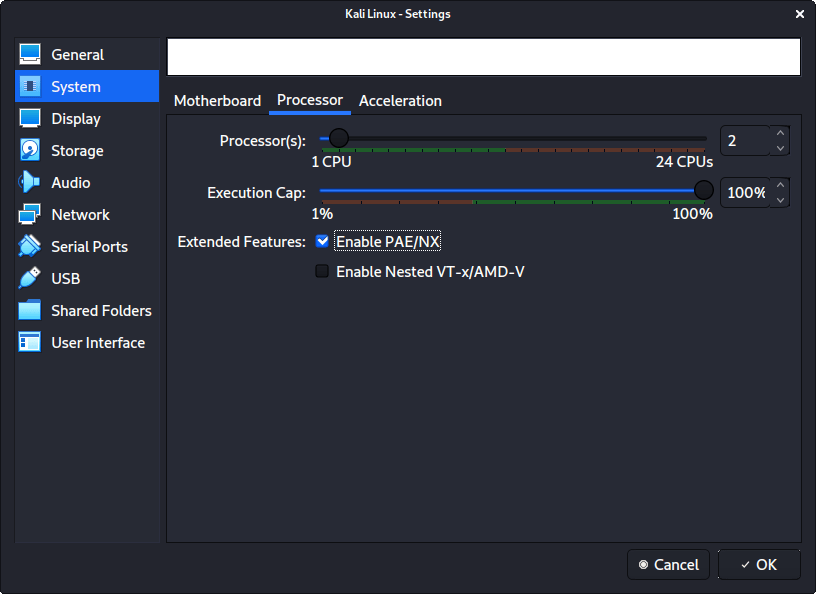
System → Processor with 2 CPUs and PAE/NX enabled.
Kali Linux Documentation · GPL-3.0
09
DISPLAY
Display → Screen: 128 MB video, 3D acceleration OFF
Video Memory defaults to 16 MB, which is not enough to drive a desktop at a sensible resolution. Raise it to 128 MB. Leave Accelerated 3D graphics unticked. The guide is blunt about why: people report it causing problems. It buys a Kali desktop nothing and costs you an evening of black screens when it misbehaves.
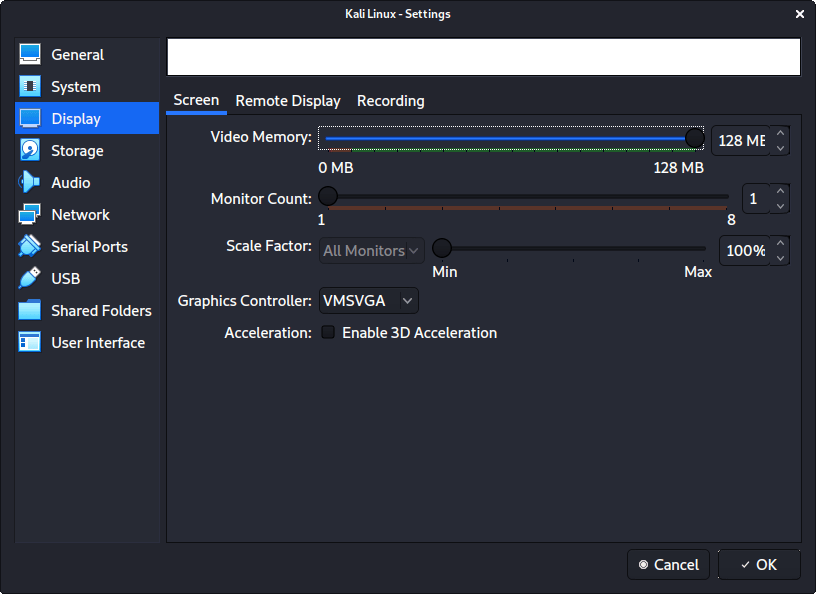
Display → Screen with Video Memory at 128 MB and 3D acceleration off.
Kali Linux Documentation · GPL-3.0
10
REVIEW
Compare your summary against this one
Before you start the machine, open the Settings overview and read it against the screenshot. Every value from the build sheet at the top of this page should appear here. Two minutes of reading now beats discovering at step 14 that the disk is 8 GB.
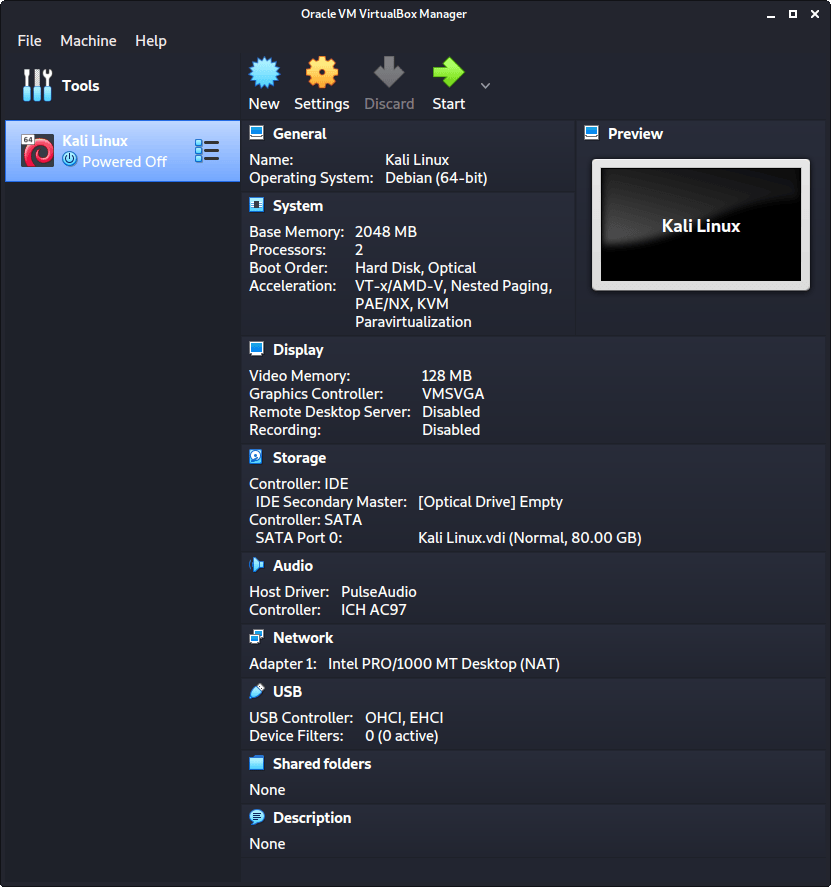
The complete settings summary for a correctly configured Kali VM.
Kali Linux Documentation · GPL-3.0
PART 3 OF 4
Attach the ISO and start
The machine is built and empty. Now give it something to boot.
11
START
Press Start — and read the prompt
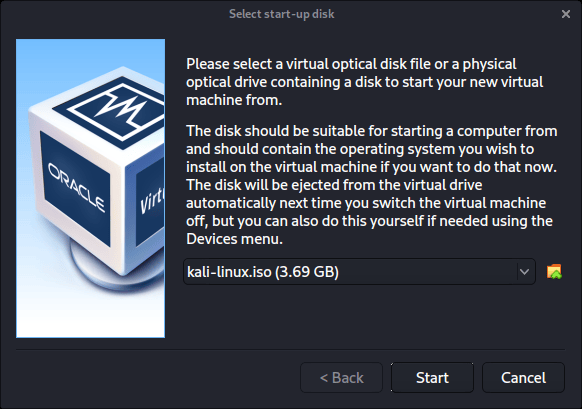
On the first run VirtualBox notices the disk is empty and asks for a start-up disk. It offers your physical drives in the dropdown, which is not what you want. Click the small folder icon beside the dropdown to pick a file instead.
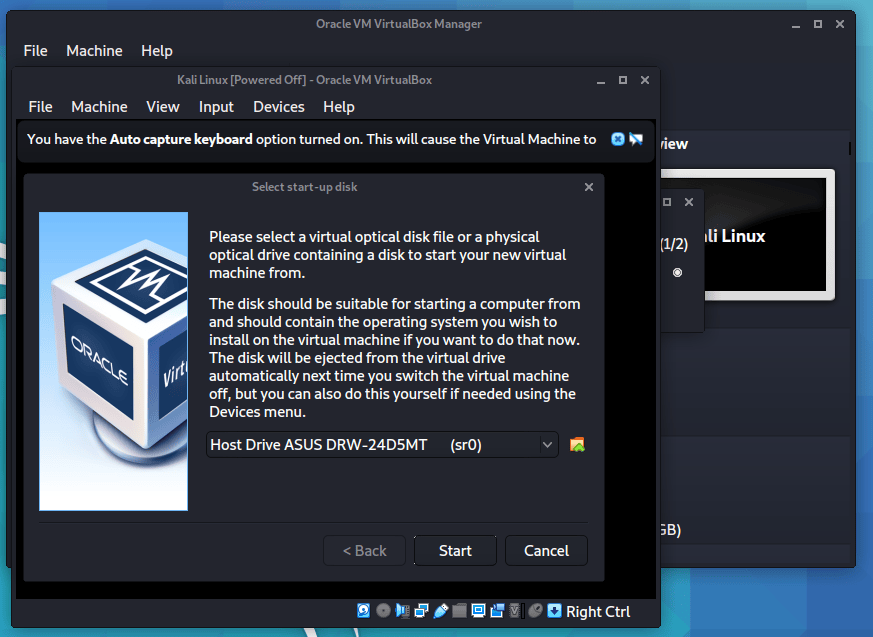
The start-up disk prompt on first boot. The folder icon is beside the dropdown.
Kali Linux Documentation · GPL-3.0
12
ATTACH ISO
Optical Disk Selector → Add → your verified ISO
The Optical Disk Selector opens, listing any images VirtualBox already knows about. Press Add, navigate to your Kali installer ISO, and Open. It now appears in the list. Make sure the row is actually selected — highlighted, not merely present — and press Choose. Adding without selecting is a small trap that leaves you back at an empty drive.
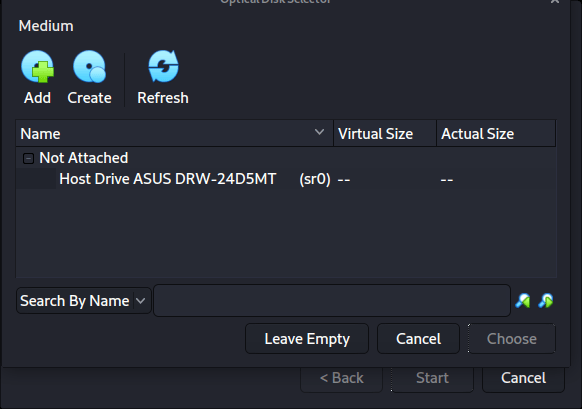
Optical Disk Selector with Add in the toolbar.
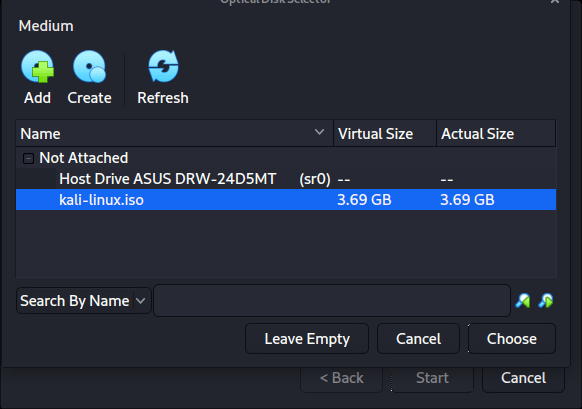
The ISO added and selected, ready for Choose.
Kali Linux Documentation · GPL-3.0
13
BOOT
Start, and hand over to the installer
Press Start. The VM boots the ISO and the Kali boot menu appears — and this lab's job is finished. From here the procedure is identical to a bare-metal install: language, hostname, user account, partitioning, metapackages, GRUB. One thing worth knowing before you go: the Kali installer detects that it is running inside a VM and installs the guest tools for you, virtualbox-guest-x11 among them. You should not need to install them by hand. If your screen is still stuck at a small fixed resolution after the install finishes, that detection did not fire, and there is a one-line fix in the troubleshooting section below.
Start — the VM boots the attached ISO.
Kali Linux Documentation · GPL-3.0
This is where Lab 01B starts
You now have a VM that boots the Kali installer. Lab 01B walks the nineteen installer screens with the official screenshots — language and keymap, hostname, your non-root user, guided partitioning, the proxy screen everyone gets stuck on, metapackage selection, GRUB, and the first-boot checks. Do not skip the snapshot at the end of it. A VM without a clean baseline is a VM you will rebuild.
PART 4 OF 4
When the disk fills up
Months later, when wordlists and captures have eaten the disk. Bookmark this part; you will come back to it.
14
POWER OFF
Shut the VM down completely
Not saved state, not paused — powered off. Resizing a disk that a running machine has open is how you corrupt it. Take a snapshot first as well, in case the resize goes sideways.

The VM shown powered off in the Manager.
Kali Linux Documentation · GPL-3.0
15
MEDIA MANAGER
File → Tools → Virtual Media Manager
With the machine selected, open the Virtual Media Manager. It lists every virtual disk VirtualBox knows about, across all your VMs — which is also the place to find the orphaned 40 GB files left behind by machines you deleted carelessly.

File → Tools → Virtual Media Manager.
Kali Linux Documentation · GPL-3.0
16
RESIZE
Grow the VDI, then grow the filesystem inside it
Click your VM's .vdi, drag the size slider or type a new figure, and Apply. That enlarges the virtual disk — the container. It does not enlarge the partition or the filesystem inside it, so Kali will still report the old size. Boot the VM and extend the partition with gparted, then grow the filesystem onto the new space:
Shrinking is a different and far riskier operation. If you need a smaller disk, build a new VM.

The Virtual Media Manager with the size slider and Apply.
Kali Linux Documentation · GPL-3.0
WHEN IT BREAKS
Six failures, all from this half of the lab
Everything here happens before the installer even loads, which is why it feels so much more confusing than it is.
The Version dropdown has no 64-bit options at all
My wizard has four pages, not seven
A green turtle icon appears in the status bar and everything crawls
The VM boots to "FATAL: No bootable medium found"
The desktop is stuck at a small fixed resolution after installing
"Kernel driver not installed (rc=-1908)" on a Linux host
QUESTIONS FROM CLASS
Asked in every batch
Why build the VM by hand when Kali publishes a ready-made VirtualBox image?
80 GB for a virtual disk? That seems huge.
Should Hard Disk really be first in the boot order?
What is PAE/NX and why does the guide enable it?
Can I enable 3D acceleration for a smoother desktop?
Do I have to install VirtualBox Guest Additions myself?
My screenshots do not match — different colours, different wizard.
SOURCES & LICENCE
Where this procedure and these screenshots come from
This lab follows “Kali inside VirtualBox (Guest VM)” from the official Kali Linux documentation, last updated upstream on 30 June 2026 by g0tmi1k and serval123. It is the same procedure OffSec uses to build the published Kali VirtualBox images. All twenty screenshots are taken from that page and reproduced unmodified. Its source repository, kali-docs, is licensed under the GNU General Public License v3.0 only. The VirtualBox 7 mapping table, the classroom memory recommendation and the troubleshooting section are ours.
ATTRIBUTION
Source: Kali Linux Documentation, “Kali inside VirtualBox (Guest VM)” Authors: g0tmi1k, serval123 Repository: gitlab.com/kalilinux/documentation/kali-docs Licence: GPL-3.0-only · gnu.org/licenses/gpl-3.0 Changes: none, images reproduced unmodified Upstream update: 2026-Jun-30
Kali Linux is a trademark of OffSec Services Limited. VirtualBox is a trademark of Oracle. Skills Uprise is not affiliated with, endorsed by or sponsored by either. Product names and screenshots are used to describe the software being taught.
LAB 01A COMPLETE
The machine exists. Now put an operating system on it.
Submit one screenshot for Lab 01A: your Settings summary, matching the build sheet. Then continue to Lab 01B.
LAB 01B
Walk the Kali installer
Nineteen installer screens with the official screenshots, ending in a clean-baseline snapshot.
LAB 02
XAMPP and DVWA
Stand up a deliberately vulnerable web app so you have something legal to attack from Kali.
LAB 04
An isolated host-only network
Put Kali and its target on a private network, unreachable from anything real.