
SKILLS UPRISE · CYBER LAB SERIES · LAB 02A
A web server, a database and PHP on your own laptop in twenty minutes — the target you will spend the next several labs attacking. Twenty steps: download, install, verify, then the four hardening steps almost every XAMPP tutorial leaves out. Do not skip Part 4. An unhardened XAMPP with DVWA on top is a genuinely vulnerable machine, and it will be on your college wifi.
Install XAMPP on Windows
Beginner · 20–30 minutes · Windows 10 or 11 · Prepares Lab 02B (DVWA) · Updated July 2026
BUILD SHEET
XAMPP ships wide open on purpose — it is a workbench, not a server. Part 4 closes it down.
Only from apachefriends.org. XAMPP is one of the most-repackaged installers on the internet, and the mirrors that rank well on search are not all clean.
BEFORE YOU START
Two things to understand, one thing to check
WHAT YOU ARE ACTUALLY INSTALLING
Four programs, one installer
XAMPP is not a program. It is a bundle that installs four separate pieces of software and wires them together so you do not have to: Apache — the web server. Listens on a port, receives HTTP requests, returns pages. MariaDB — the database. A drop-in replacement for MySQL, which is why every tutorial says “MySQL” and the Control Panel button says MySQL while the software underneath is MariaDB. PHP — the language your target applications are written in. DVWA, WordPress, most of the vulnerable web apps you will study. phpMyAdmin — a web interface for the database, so you can read tables in a browser instead of from a SQL prompt. Understanding that it is four things matters the moment something breaks. “XAMPP is not working” is never the real problem. Apache failed to bind to port 80, or MariaDB will not start because a previous MySQL install is holding 3306. Different problems, different fixes.
It is a workbench, not a server
Apache Friends say this plainly: XAMPP is built for local development, and its default configuration favours convenience over security. Out of the box: • the database root account has no password • phpMyAdmin is reachable with no login • services may listen on every network interface • directory listings and verbose errors are on Every one of those is a deliberate choice to make a beginner's first hour easy. Every one is also a finding you would write up in a report. Part 4 fixes the four that matter.
Check these ports before you start
Port conflicts cause the single most common XAMPP failure: you press Start, the log turns red, and nothing explains why. Something else on your machine already owns the port. Run this in PowerShell first and you will know in advance.
Moving Apache to 8080 is not a defeat — it just means your lab lives at http://localhost:8080 instead of http://localhost. Note it down, because every later lab assumes you know which it is.
PART 1 OF 5
Download the right build
Two steps, one decision that will matter in Lab 02B.
01
DOWNLOAD
Get the Windows installer — and pick your PHP branch deliberately
Go to apachefriends.org and take the XAMPP for Windows installer. Nowhere else. XAMPP is endlessly repackaged by download portals that wrap it in adware, and several of those rank above the real site for obvious search terms. Apache Friends publish several builds in parallel, each bundling a different PHP version. That choice is not cosmetic: PHP 8 removed functions that older PHP applications relied on, and some deliberately-vulnerable teaching apps are pinned to particular versions. Before you download, open the README of whatever you plan to install on top — DVWA in Lab 02B — and check which PHP version it states support for. Then take the matching XAMPP build. Getting this wrong is recoverable but tedious: you end up reinstalling XAMPP after an afternoon of debugging errors that were never your code.
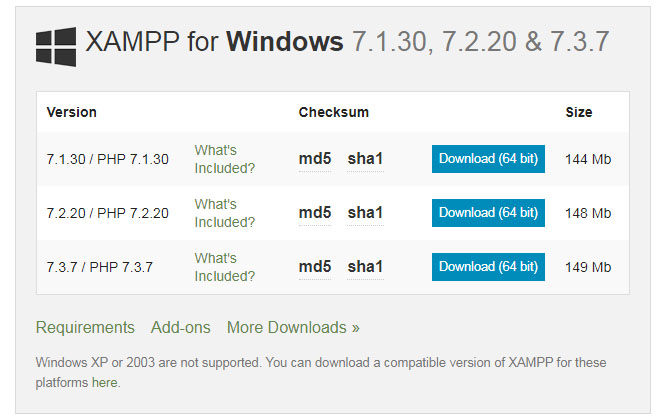
📸 The apachefriends.org download page, with the Windows builds and their bundled PHP versions visible. → 01-download-page.png
📸 The download beginning in your browser, filename and size visible. → 02-download-file.png
02
VERIFY
SmartScreen, antivirus, and one thing to do before you double-click
Windows will likely warn you. SmartScreen flags installers it has not seen often, and this one is a large executable that wants to write outside Program Files and open network ports — which is, fairly, what a lot of malware also does. Check the publisher in the file's Properties → Digital Signatures before you run it. If your antivirus quarantines it outright, do not simply disable your antivirus: verify you downloaded from apachefriends.org, then add a targeted exclusion for the installer and for C:\xampp. A blanket “turn off Defender” is the habit that gets students genuinely infected later in the course. Close Skype, IIS, VMware and any running MySQL now, so step 03 has clean ports.
📸 The SmartScreen or antivirus prompt, and the Digital Signatures tab of the file's Properties. → 03-smartscreen.png
PART 2 OF 5
Run the installer
Seven screens. One of them — the install folder — is the decision people regret.
03
UAC
Right-click → Run as administrator, and read the UAC warning
The installer needs administrator rights to register services and write to the drive root. Right-click the file and choose Run as administrator rather than double-clicking, so you are not halfway through a failed install when Windows objects. You may also see a warning about User Account Control being active, advising against installing into C:\Program Files. Take that seriously — it is the reason for step 05.
📸 The UAC elevation prompt, and the installer's own UAC advisory if it appears. → 04-uac-warning.png
04
WELCOME
The setup wizard opens
A standard InstallBuilder wizard: Welcome, then Next. Nothing to decide yet. If the window never appears, check the taskbar — it occasionally opens behind whatever you were doing.
📸 The XAMPP Setup welcome screen. → 05-welcome.png
05
COMPONENTS
Choose components — you need four of them
The default is everything ticked, which installs several servers you will never start. Keeping them costs disk and adds attack surface for no benefit. Keep: Apache, MySQL, PHP, phpMyAdmin. Those four are the stack every later lab assumes. Safe to untick: Tomcat, Mercury Mail, FileZilla FTP, Webalizer, Perl, Fake Sendmail. If a future lab needs one you can re-run the installer. Mercury Mail and FileZilla in particular are old components that have no place running on a student laptop by default — an FTP server and a mail server you did not ask for and will never patch.
📸 The Select Components tree, with your ticks matching the four you keep. → 06-components.png
06
FOLDER
Install to C:\xampp — never into Program Files
The default is C:\xampp and you should accept it. This looks untidy if you are used to software living in Program Files, and there is a real reason for it. Windows protects Program Files with UAC. Apache, MariaDB and PHP all need to write inside their own install directory constantly — logs, databases, sessions, uploaded files, your own PHP code. Put XAMPP under Program Files and those writes get silently virtualised or refused, producing failures that look like configuration bugs and are not. Every troubleshooting hour you save this semester traces back to this one screen. A path with no spaces also saves you quoting problems in config files later. Another drive is fine — D:\xampp works. A OneDrive-synced folder does not: sync will fight the database for the same files.
📸 The installation folder screen showing C:\xampp. → 07-install-folder.png
07
LANGUAGE
Pick the Control Panel language
English or German — those are the two the Control Panel ships with. This only affects the Control Panel interface, not Apache, PHP or your applications.
📸 The language selection screen. → 08-language.png
08
BITNAMI
Untick the Bitnami offer
The installer offers to open a page about Bitnami, which sells pre-packaged application stacks. It is not part of XAMPP and you do not need it. Untick the box so a browser tab does not open at the end of your install.
📸 The Bitnami for XAMPP screen with the checkbox cleared. → 09-bitnami.png
09
INSTALL
Ready to install → Next, then wait
Confirm and let it run. Extraction takes two to five minutes depending on your disk. Windows Firewall may prompt during this stage or on first start. When it does, allow access on Private networks only and leave Public unticked. That single checkbox is the difference between a web server your laptop can reach and one the entire campus wifi can reach.
📸 The installation progress bar. → 10-installing.png
📸 The Windows Firewall prompt with Private ticked and Public unticked. → 11-firewall.png
10
FINISH
Finish, and let it open the Control Panel
Leave the “Do you want to start the Control Panel now?” box ticked and click Finish. Installation is done; nothing is running yet.
📸 The completion screen. → 12-finish.png
PART 3 OF 5
Start it and prove it works
Four steps. If any of them fails, the troubleshooting section below is organised by exactly how it failed.
11
CONTROL PANEL
Learn the Control Panel before you press anything
The Control Panel is your switchboard, and every column on it earns its place: Module — the five services. You will only use Apache and MySQL. PID(s) — filled in when a service is running. Empty means stopped. Port(s) — what it actually bound to. This is where you confirm 80/443 and 3306 rather than assuming. Start / Stop — does what it says. Admin — opens the dashboard for Apache, phpMyAdmin for MySQL. Config — opens the real configuration files. httpd.conf for Apache, my.ini for MariaDB. Logs — the first place to look when a Start goes red. Not the last. The checkbox to the left of each module installs it as a Windows service that starts with the computer. Leave those unticked. You want to start your web server when you are doing lab work and have it off the rest of the time — see step 18.
📸 The XAMPP Control Panel at rest, all modules stopped, columns clearly visible. → 13-control-panel.png
12
START
Start Apache, then MySQL
Press Start next to Apache. The module name turns green, a PID appears, and the Port column fills with 80, 443. Then start MySQL: green, a PID, port 3306. If either turns red and stops, read the log panel at the bottom — it names the port and the conflict. That is a port collision, not a broken install, and the ports table earlier in this page lists the usual culprits.

📸 Both Apache and MySQL running green with PIDs and ports shown. → 14-services-running.png
13
LOCALHOST
Open http://localhost
In your browser, go to http://localhost — or http://localhost:8080 if you moved Apache. The XAMPP dashboard appears, which means Apache is serving files from C:\xampp\htdocs. Then http://localhost/phpmyadmin to confirm the database side. phpMyAdmin should load and show your databases without asking for a login. That is convenient, and it is also the first thing you will change in Part 4.
📸 The XAMPP dashboard at http://localhost. → 15-dashboard.png
📸 phpMyAdmin loading at http://localhost/phpmyadmin. → 16-phpmyadmin.png
14
VERIFY
Write one file and read the stack back
The dashboard proves Apache works. This proves PHP executes, which is a different claim. Create C:\xampp\htdocs\info.php containing a single line, then open http://localhost/info.php. You should get the PHP information page — version, loaded extensions, configuration file paths. Note the PHP version and confirm mysqli is listed; that is the extension your PHP applications will use to reach MariaDB.
Delete info.php when you are done. A full phpinfo() page is a reconnaissance gift — exact versions, absolute paths, every extension and setting. On a real server, finding one is a reportable finding. Get into the habit now.

📸 The phpinfo page with the PHP version banner visible. → 17-phpinfo.png
PART 4 OF 5
Now close it down
The four steps most XAMPP tutorials skip. You are a security student: installing a service and leaving it at its defaults is the exact behaviour you will be paid to find in other people's systems.
15
DB PASSWORD
Give the database root account a password
MariaDB's root user ships with no password at all. Anything that can reach port 3306 — any process on your machine, and anything on your network if the bind is wrong — has full control of every database. Set one from the Shell button in the Control Panel:
Use something you will still have next month, and do not reuse a password that protects anything real. This one lives in a config file in plain text — which is itself a lesson about how web application credentials work.
📸 The MySQL shell showing the ALTER USER statement succeeding. → 18-db-password.png
16
PHPMYADMIN
Tell phpMyAdmin about the new password
The moment you set that password, phpMyAdmin breaks — it was connecting as root with an empty one. Fix it in C:\xampp\phpMyAdmin\config.inc.php. Find the password line and fill it in, and switch the auth type from config to cookie so phpMyAdmin asks you to log in instead of holding the credentials itself:
Reload http://localhost/phpmyadmin and you should get a login form. That form is the point.
📸 phpMyAdmin presenting a login form after the config change. → 19-phpmyadmin-login.png
17
BIND LOCAL
Make both services listen on 127.0.0.1 only
This is the step that decides whether your lab is a lab or a public service. Bound to 0.0.0.0, Apache and MariaDB accept connections from anything that can route to your laptop — every other device on your hostel or campus wifi. Bound to 127.0.0.1, only your own machine can reach them. Apache, in C:\xampp\apache\conf\httpd.conf:
MariaDB, in C:\xampp\mysql\bin\my.ini, under the [mysqld] section:
Stop and start both services from the Control Panel, then confirm the bind actually changed rather than trusting the edit:
From Lab 02B onward this stops being hygiene and becomes essential. DVWA is deliberately vulnerable software. Hosting it on an interface your campus network can reach means you have put an intentionally exploitable application on a shared network — which, depending on who finds it and how they use it, stops being your lab and becomes an incident with your name on it.
📸 httpd.conf showing the Listen directive bound to 127.0.0.1. → 20-httpd-bind.png
📸 netstat output confirming 127.0.0.1:80 rather than 0.0.0.0:80. → 21-netstat-verify.png
18
OFF BY DEFAULT
Do not run it as a service. Stop it when you finish.
Leave the service checkboxes in the Control Panel unticked. A web server and a database that start with Windows are two internet-facing programs running every hour you are not using them, silently accumulating unpatched versions. Start them when you sit down to lab work, stop them when you are done. The Control Panel makes this two clicks; from an administrator prompt it is two commands:
Then take the habit further: keep XAMPP patched. Because it bundles Apache, PHP and MariaDB, a vulnerability in any one of them is a vulnerability in your machine, and XAMPP does not update itself. Check apachefriends.org each term.
📸 The Control Panel with service checkboxes clear and both modules stopped. → 22-services-stopped.png
PART 5 OF 5
htdocs, and where Lab 02B goes
One folder to understand, and you are ready for the next lab.
19
HTDOCS
C:\xampp\htdocs is the web root
Everything Apache serves lives under C:\xampp\htdocs. The mapping is simple and worth saying out loud once: C:\xampp\htdocs\index.php → http://localhost/ C:\xampp\htdocs\hello.php → http://localhost/hello.php C:\xampp\htdocs\dvwa\login.php → http://localhost/dvwa/login.php A folder in htdocs becomes a path in the URL. That is the whole model, and it is the model you will be probing for the rest of the course — directory traversal, file upload, path disclosure all come back to this mapping. Make one file to prove you own it:
Save it as C:\xampp\htdocs\lab.php and open http://localhost/lab.php. If you see the heading, a PHP version and “DB: connected”, all four pieces of your stack are working together — and that is genuinely the finish line for this lab.
📸 http://localhost/lab.php showing the heading, PHP version and DB: connected. → 23-lab-verify.png
20
NEXT
Back up the config, then move on
Before Lab 02B changes things, copy the three files you edited somewhere safe. When a later lab breaks your stack, a five-second restore beats a reinstall:
Lab 02B installs DVWA into htdocs and creates its database. Everything it asks for — a database root password, a working mysqli, htdocs, services you can start and stop — you now have.
📸 Your baseline folder containing the four copied config files. → 24-config-backup.png
WHEN IT BREAKS
Eight failures, sorted by what you actually see
Find your symptom, not your guess. The Control Panel log at the bottom of the window names the real error in almost every one of these — read it before you search.
Apache will not start — "Port 80 in use by ... with PID"
Apache starts, then immediately stops, with nothing obvious in the log
MySQL will not start
"Access denied for user 'root'@'localhost'" everywhere after Part 4
phpinfo works but the database connection fails from PHP
Everything ran fine, then broke after you moved XAMPP to Program Files
The Control Panel says "must be run as administrator"
Your files are in htdocs but the browser shows a directory listing or 404
QUESTIONS FROM CLASS
Asked in every batch
Is it safe to install XAMPP on my normal laptop?
Should I install XAMPP on Windows or inside the Kali VM?
Why C:\xampp and not Program Files?
XAMPP, WAMP, Laragon or Docker?
Which PHP version should I pick?
Do I need to keep XAMPP updated if it is only local?
Can I host my college project on XAMPP so my friends can see it?
The Control Panel shows MySQL but I read that XAMPP uses MariaDB. Which is it?
SOURCES
Where this comes from
Download links, bundled component versions and the guidance that XAMPP is intended for local development rather than production all come from Apache Friends, the non-profit project that publishes XAMPP. Port-conflict behaviour, the UAC and install-path reasoning, the hardening steps in Part 4 and the troubleshooting section are drawn from our own classroom experience across student batches. Every screenshot on this page is captured by Skills Uprise on Windows 11 with a current XAMPP build.
VERSIONS MOVE
XAMPP publishes several builds in parallel, each with a different PHP version, and the bundled Apache, MariaDB and phpMyAdmin versions change between releases. Treat the build sheet at the top of this page as the shape of the stack rather than exact numbers, and read what the download page lists on the day you install.
XAMPP and Apache Friends are the property of their respective owners. Apache, MariaDB, PHP and phpMyAdmin are the property of their respective projects. Skills Uprise is not affiliated with, endorsed by or sponsored by any of them. Names are used to describe the software being taught.
LAB 02A COMPLETE
You built a target. Next you make it vulnerable on purpose.
Submit two screenshots for Lab 02A: http://localhost/lab.php showing PHP and DB: connected, and netstat output proving both services are bound to 127.0.0.1. The second one is the graded part — anyone can start a web server; a security student binds it correctly.
LAB 02B
DVWA on your XAMPP stack
Install a deliberately vulnerable web app into htdocs — legally, and isolated.
LAB 01B
Walk the Kali installer
The machine you will attack this target from, built step by step.
LAB 04
An isolated host-only network
Put attacker and target on a private network, unreachable from anything real.